5 Super Hot Summer Crafts and Activities for this holiday | Holiday Fun Series #3
There’s nothing quite like the summer! Warm weather, fresh food, fun colours! With a few weeks left before the kids go back to school, here are some fantastic summer crafts and activities to keep them busy during this holiday!

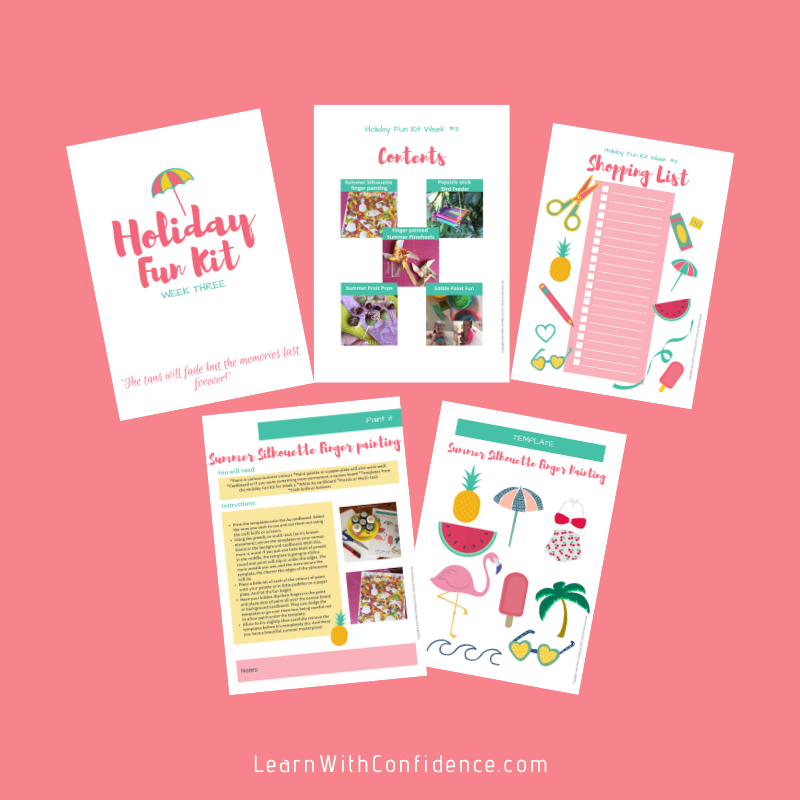
And, as with the first and second parts of this series, I have created this FREE Holiday Fun Kit for week 3 where you’ll find all the instructions and templates for these crafts and activities.
Before we jump in, some of these crafts are a little more advanced and may need you to help a little more. Especially if your kiddos are little. But it’s a perfect opportunity to have some fun with your kids this holiday!
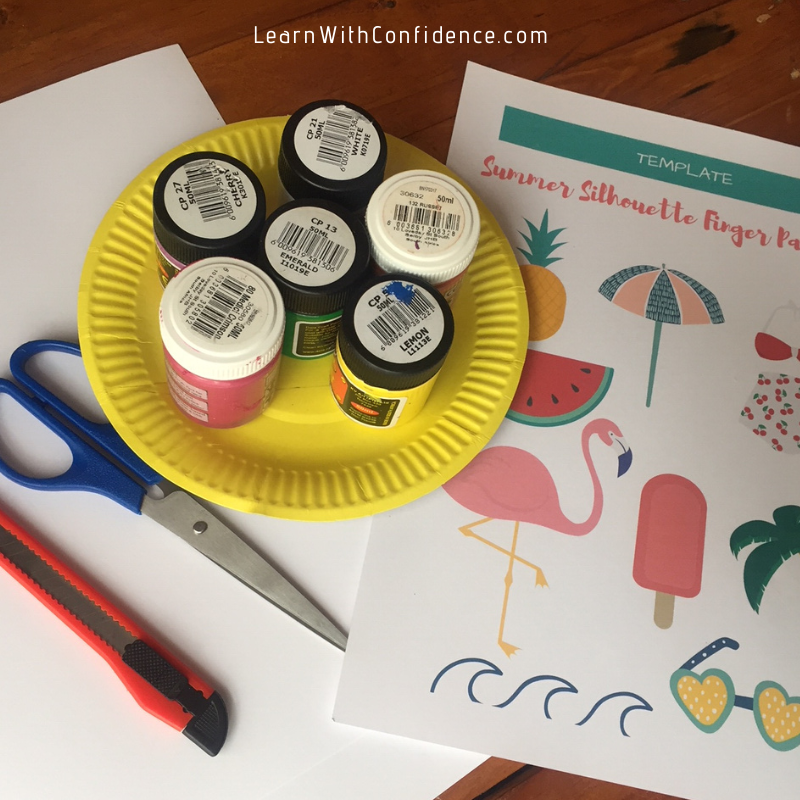
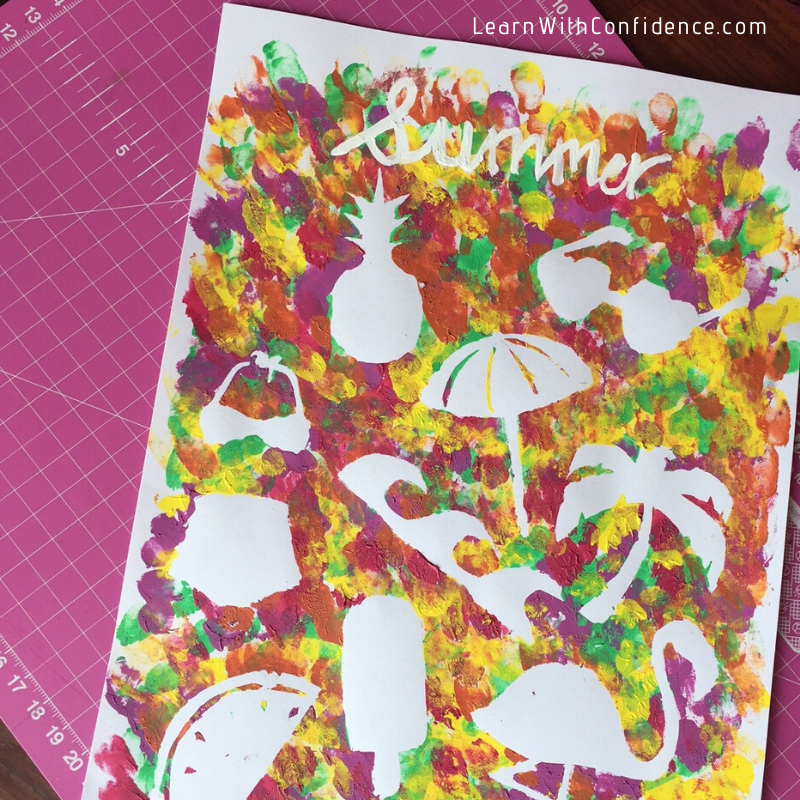
Paint it: Summer Silhouettes Finger Painting
My littles LOVE painting. I’m not sure if it’s the colours or the texture of the paint or whether it’s just so exciting to create something, but they’re really into it! This summer craft will give them the opportunity to go a bit wild and get a bit messy while they create something that’s actually quite lovely!
You’ll need:
- Paint in various summer colours
- Paint palette or a paper plate will also work well!
- Cardboard or if you want something more permanent, a canvas board
- Templates from the Holiday Fun Kit for Week 3
- White A4 cardboard
- Prestik or Multi-tack
- Craft knife or Scissors
Make it happen:
- Print the templates onto the A4 cardboard. Select the ones you wish to use and cut them out using the craft knife or scissors.
- Using the prestik, or mutli-tack (as it’s known elsewhere), secure the templates to your canvas board or the background cardboard. With this, more is more! If you put one little blob of prestik in the middle, the template is going to slide a round and paint will slip in under the edges. The more prestik you use, and the more secure the template, the cleaner the edges of the silhouette will be.
- Place a little bit of each of the colours of paint onto your palette or in little puddles on a paper plate.
- And let the fun begin! Have your kiddos dip their fingers in the paint and place dots of paint all over the canvas board or background cardboard. They can dodge the templates or go over them too, being careful not to allow paint under the template.
- Allow to dry slightly then carefully remove the templates before it’s completely dry. And there you have a beautiful summer masterpiece!
Variations
This craft is SO versatile and can be used for so many different purposes!
With Valentines day coming up soon, create a template of a heart or the word “LOVE” or even a short message and turn it into a special gift for a special someone.
Have a birthday coming up soon, create a cute personal card with birthday friendly images as your template.
Or save this idea for next Christmas and print off some cute Christmas images to make a cute decoration for your home!
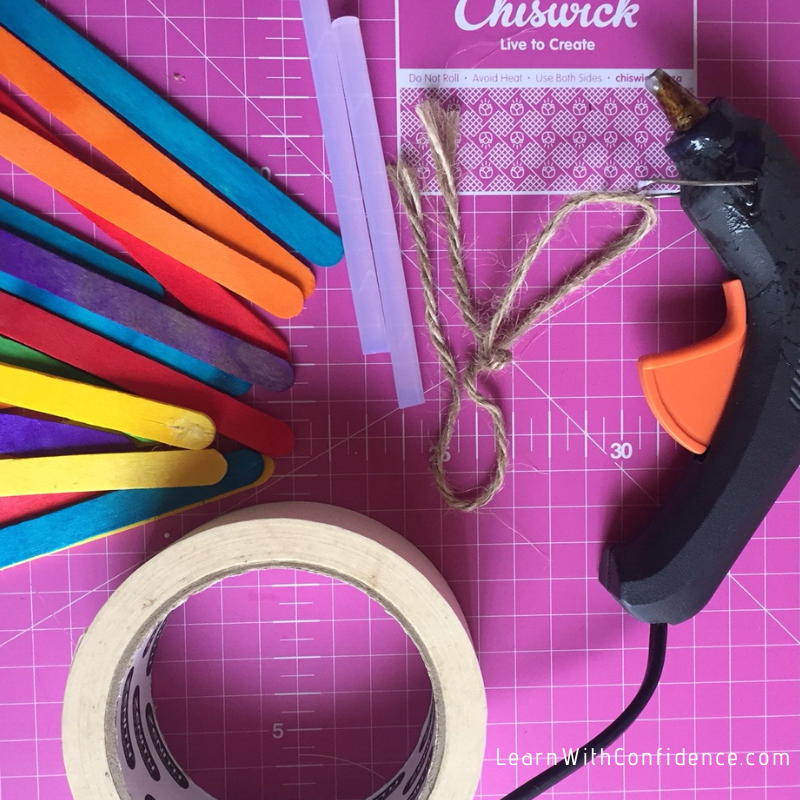
Build it: Popsicle Stick Bird Feeder
Isn’t it beautiful to wake up to the birds singing and chattering in the trees? This summer craft is perfect to keep them coming to your garden and its so pretty it’ll add a little colour to your garden too!
If you’re using a glue gun, the kids will need your help with this one. But you can use wood glue as an alternative, it just takes a bit longer to dry and set.
You’ll need:
- Popsicle sticks – You can buy packs of them at craft stores. I bought some coloured ones so this craft is even easier, but you can always go with the plain ones and paint them as you wish.
- Glue gun and glue sticks OR Wood glue
- Twine or string
- Masking tape
Make it happen:
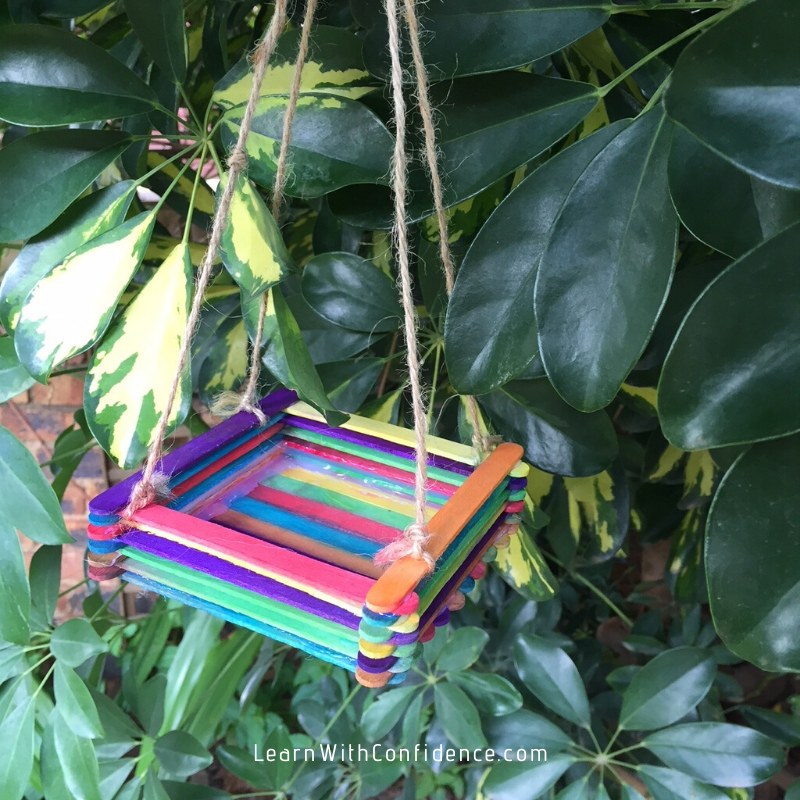
- Position 10 sticks side-by-side and use masking tape to secure them together in position. This creates the base.
- Glue down two sticks on top of the base – one on each end, going across the other sticks in the opposite direction. This will be the beginning of the “walls” of your feeder and this also secures your base permanently.
- Glue down two sticks to the ends of the ones you stuck down in step two, in the opposite direction so they’re end to end.
- You’re going to just keep repeating this step until you’re happy with the height of the “walls” of the bird feeder (I went about 6 sticks high). But before you do, use some hot glue to seal the gaps in the layers you have already created. Neatly place a thick line of glue inside the edges and corners of your base so the bottom layers are sealed and bird seed won’t just fall out.
- Once you’re happy with the walls of your feeder. Secure a piece of twine to each of the four corners of the feeder, through the gap between the top two sticks on each wall. Bring the four pieces together and secure them in knot.
- Use another piece of twine to hang your feeder up on a branch in your favourite tree! Fill it up with wild bird seed and enjoy watching some new little feathered visitors come to your garden!
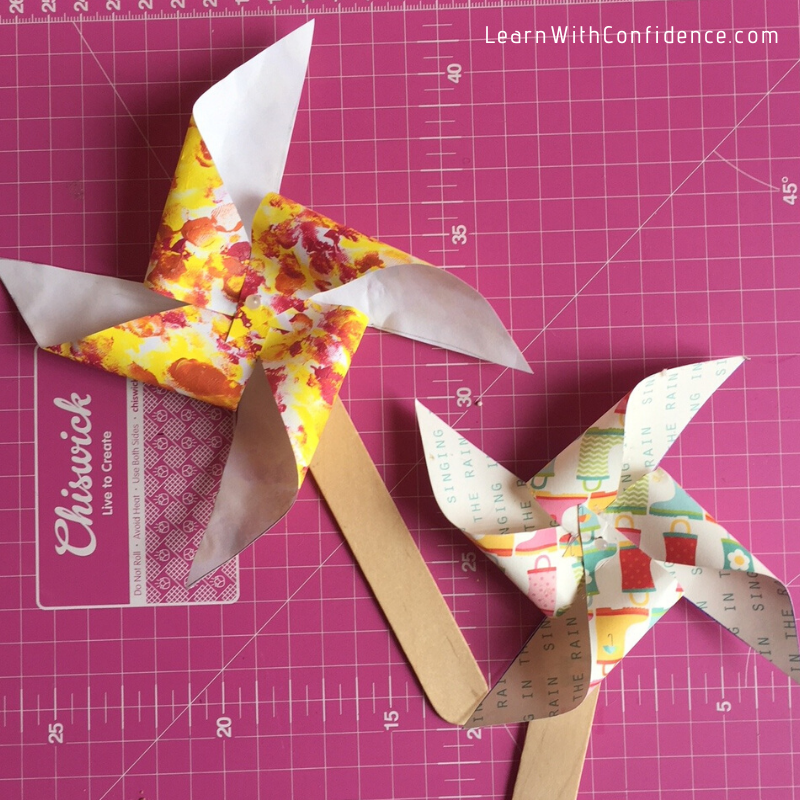
Paper Craft: Finger-painted Summer Pinwheels
I’m sure you made these as a kid. It’s become a bit of a timeless craft! Your children will have so much fun watching them twirl in the warm summer breeze or blowing them round and round.
You’ll need:
- White cardboard or paper (Thinner paper or card will move more easily but will be less durable.)
- Template from the Holiday Fun Kit for Week 3
- Paints
- Scissors
- Drawing pin
- Paper clip
- Glue gun and glue sticks
- Popsicle sticks

Make it happen:
- Use the paints and finger paint a colourful design on one side of the paper or cardboard. Allow to dry.
- You can do the same on the other side in a different colour or you can leave it plain white.
- Use the template to cut out the square and on the lines going in from the corners. Be sure to mark the dots in the centre and corners.
- Using the drawing pin to make holes where each of the holes is.
- Now it’s time to glue it all together. Put the drawing pin through the centre hole from the back. Bend one of the corners towards the centre and put it over the drawing pin. Now carefully lift the flap and put some glue under the flap to secure the flat to the centre. Repeat with all of the other corners.
- IMPORTANT: When you glue anything – make sure you don’t glue the pinwheel to the drawing pin; it must move freely.
- Remove the drawing pin from the pinwheel and use it to make a hole in the flat side of the popsicle stick.
- Now you’re going to make the shaft the pinwheel will spin around. Bend the outside end of the paperclip so it is at 90 degrees to the rest of the paperclip. Push it through the hole in the popsicle stick and use hot glue to secure the paperclip at the back. Put a little blob of hot glue around the shaft at the front as well.
- Slide the pinwheel onto the front of the popsicle stick by pushing the paperclip shaft through the holes in the pinwheel. Put a blob of hot glue on the tip of the paperclip shaft. This will keep the pinwheel on the shaft, but the pinwheel should turn easily and freely!
- Now it’s time to head outside into the warm summer breeze and have some fun!
Variations
We did finger painting on white paper but you could as easily use plain coloured paper or even scrapbooking paper would work well too!
If you want a smaller or bigger pinwheel just adjust the size of the template to fit the size you want.
They make beautiful decorations for a garden party and can be made as child-friendly or more mature as you wish! Certainly a classic and versatile craft!

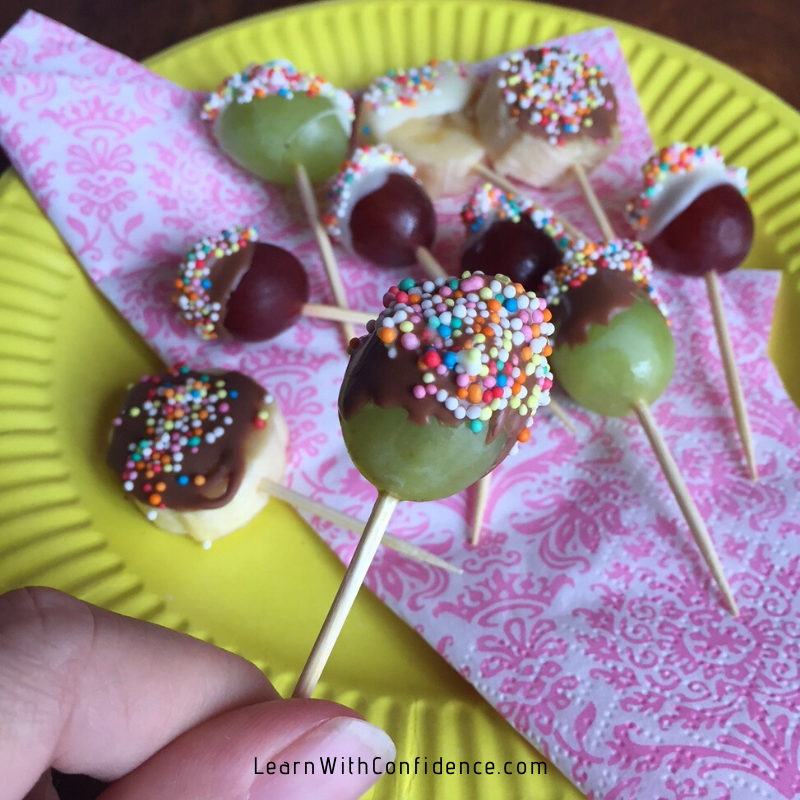
Cook, Bake or Decorate: Summer Fruit Pops
What a fun summer treat and so simple to whip up! Why not make these or let the kids make them when they have their friends over for a play date. These will also make fantastic party food for your child’s next birthday!
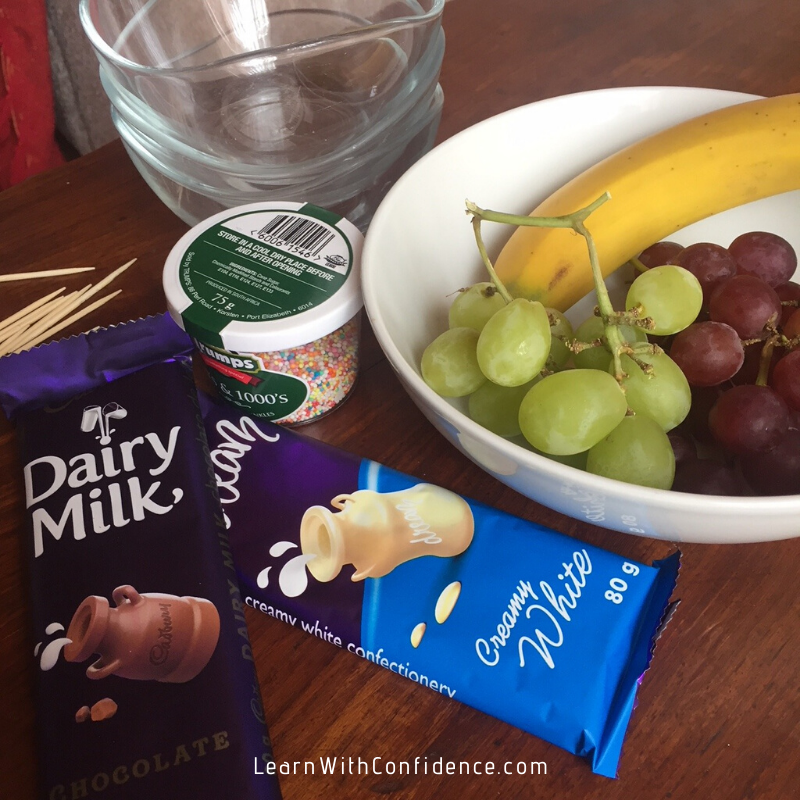
You’ll need:
- Fruit you can skewer easily such a grapes, strawberries and bananas.
- Wooden skewer sticks or toothpicks
- Chocolate for melting – white, milk or dark will work!
- Sprinkles
Make it happen:
- Prepare the fruit – cut off the strawberry stalks, cut bananas into bite sized chunks, take grapes off the stalks.
- Melt the chocolate. I use the microwave: Put it in for 30 second intervals stirring in between until all the chocolate pieces are melted. (Alternatively, you can melt it in a glass bowl over a pot of simmering water on the stove.)
- Skewer the fruit. Allow the chocolate to cool slightly so it’s still runny but not warm. If it’s too warm it will just run right off the fruit.
- Dip the the fruit into the melted chocolate and then into the sprinkles.
- Let them cool and solidify and you’re ready for a special, healthy (sort of) treat!
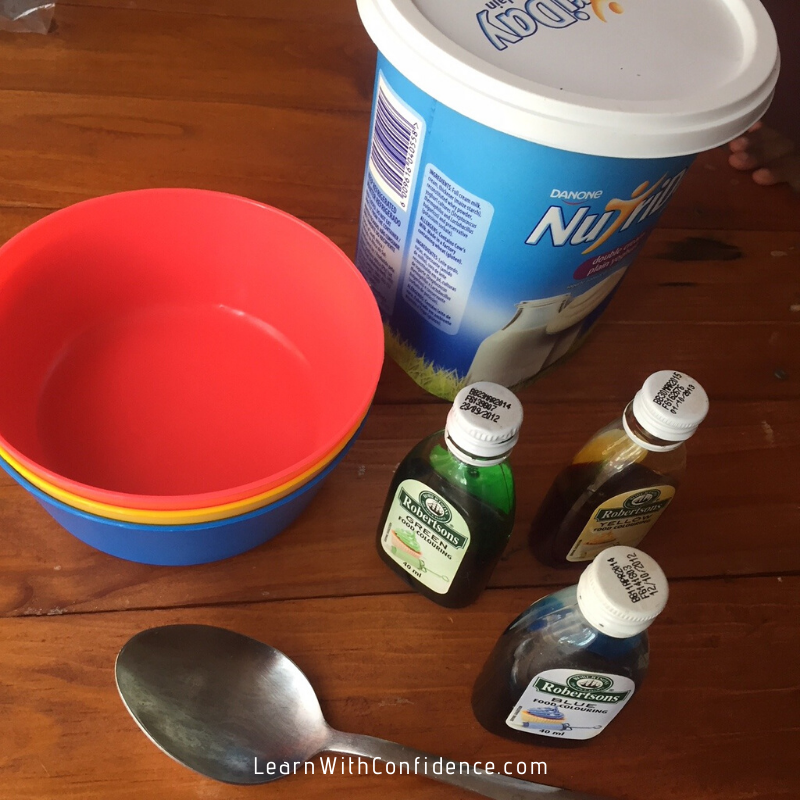
Messy Play: Edible Paint Summer Fun
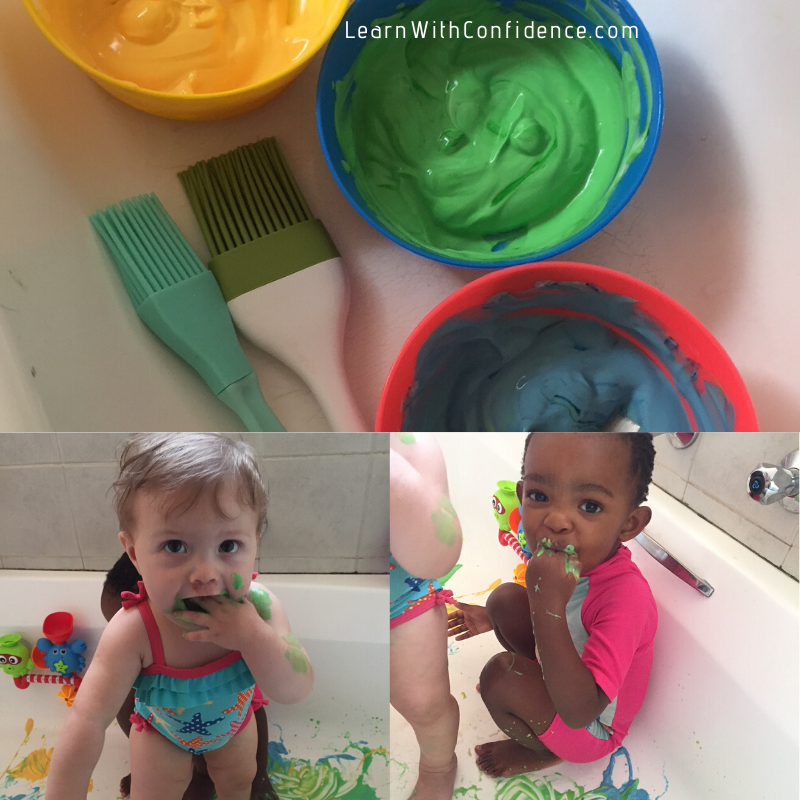
With little kiddos you’re always concerned with what goes in their mouths! With this edible “paint” you won’t have to worry! You can’t keep this masterpiece unfortunately but your little ones will have a load of fun squishing around in the paint.
You’ll need:
- Plain yoghurt
- Food colouring in a few different colours – I chose 3 colours
- Place to do your painting – a baking sheet will work well, or a clam shell or blow-up baby pool, or even in the bath (that’s the most convenient option!)
Make it happen:
- Put plain yoghurt in three bowls or containers.
- Add a few drops of food colouring to each one. Combine well.
- This is your ‘edible paint’! Done!
- Now place a few puddles of ‘paint’ on the painting surface, strip down to nappies or pop them in their costumes and let your toddler or baby get messy!
Now go have some fun in the Summer sun!
Holidays should be relaxing, a time to put your feet up and get refreshed from the busy-ness of our work. Having kids around can sometimes make us feel more busy than ever though!
I hope that these activities will give you something fun to do with your kiddos to keep them occupied but also to give you every opportunity to spend some real quality time with them. It’s so so important.
Don’t forget to subscribe so I can send you the latest posts and freebies, straight into your inbox. Now go have some fun!!